USER GUIDE
Congratulations!
This user guide contains instructions for setting up and using your Tornado A1 MIDI Controller and it’s software.
Introduction to Tornado A1: Connection, Management, Music effects.
Tornado A1 is a professional MIDI controller designed for creating and visualizing musical effects using hand movements without touching equipment. This makes it possible to visually control the parameters of virtual music synthesizers and effects in front of the audience and thereby create spectacular live performances.
Tornado A1 strengthens DJ’s contact with dancing people, helps to create good mood. Tornado A1 is the system that transforms parameters of hand motions by means of the MEMS technology in accordance with flexible algorithms and methods of the Motion Capture theory into MIDI control signals.
Tornado A1 wireless gloves are the main component of the Global DJ MIDI controller. Gloves are equipped with a convenient multifunctional multilevel MIDI keyboard attached to the backside. Various MIDI commands can be sent through use of one button.
The MIDI controller can be connected to the laptop/PC through the USB and therefore to various virtual music studios and players (Traktor 2 Pro, Ableton Live, FL Studio, VST plug-ins, Deckadance, Virtual DJ, etc.).
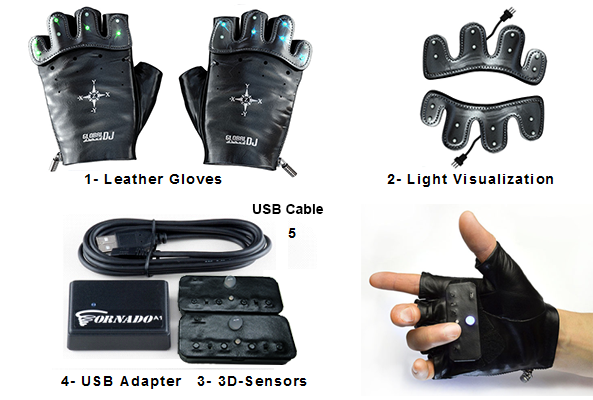
Figure 1
The Tornado A1 MIDI controller consists of the following elements (see. Figure 1):
1 – A pair of Leather gloves;
2 – A pair of LED visualizations. It is activated at the time of creating musical effects with 3D gloves. She draws the attention of people on the dance floor to the creative musical process in time;
3 – A pair of 3D-Sensors with keyboards. The Tornado A1 is a system that uses the 3D-Sensors to convert parameters of hand movements into MIDI signals according to flexible algorithms and methods of the Motion Capture theory. Moreover, the Tornado features a multifunction multi-level MIDI-keyboard located on the gloves. One button can be used for sending several MIDI-commands.
4 – USB Adapter. It connects wireless 3D gloves to a laptop.
5 – USB cable. Used in conjunction with a USB adapter and for charging 3D gloves.
Before you get started
Please, visit the DOWNLOADS section at the website and download the driver for your operating system. Install the software, following the instructions.
Primarily, we recommend you to install the driver, and after that, to connect the MIDI controller to your computer. MIDI controller Tornado A1 is delivered fully assembled and ready for operation.
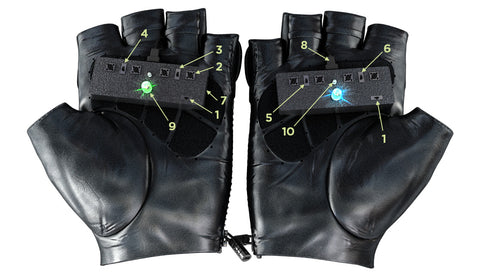
Figure 2
Control and display elements on the gloves (see. Figure 2):
1 – Power switch (equal for both hands);
2 – General-purpose buttons. Four buttons for each keyboard. Their functions is configured in the driver of MIDI controller. You can control the driver settings with them, as well as send MIDI messages to musical programs.
3 – Switch presets in driver’s playlist (Only for the left hand).
4 – Slide switch for general use.
5 – Slide switch for general use.
6 – Slide switch for general use. Additional function – Activate “Mouse” (Only for the right hand).
7 – Mini-USB connector 4-pin to charge the internal battery.
8 – Connector for external light visualization.
9 – The integrated light visualization.
10 – LED indicator for 3D-Sensors.
How does Tornado A1 work
After turning on the power sensors with the help of switch 1 (see Figure 2) signal diode 10 indicates red for Left sensor 1 time, for the Right sensor – 2 times. After that, the sensors switch to standby mode, while signal diode 10 flashes red every 5 seconds. When the START (see Figure 3) button is pressed in the Tornado plugin, the gloves switch to the control mode for musical effects and knobs (according to the selected algorithm). The signal diode stops flashing 1 time every 5 seconds and starts displaying the information that comes from the Tornado plugin. This information shows the status of the configured buttons (at the moment of switching) or the number of the selected preset (see the detailed description in the document TornadoA1Manual.pdf).

Figure 3
Preset Bank
A Preset Bank (see Figure 3) is a very useful tool containing a list of presets (earlier selected settings for all methods). In real time and by simple switching between presets, you can change any parameters in methods for MIDI signal generation, and thus alter the sequence of any desired musical effects. Double-clicking on any preset makes it a current one (by loading its settings). Similarly, you may switch between presets via a switch on the glove keyboard.
Connecting Tornado A1 to the music studio Trakt or Pro 2
To connect a MIDI controller Tornado A1 to DJ program Traktor Pro 2, a special configuration file TornadoA1.tsi was created. The file you need to add (or import). Next, you must correctly configure MIDI ports. In the In-Port option to select the port Tornado.
The first introductory launch
To get started, you need to download the Tornado A1 standard preset (Figure 3). Standard preset can be downloaded online www.global-dj.com section DOWNLOADS. Next, the downloaded preset selected as the current and run the program (press the START button). Easy to get started with the Tornado A1 using the standard presets for DJ software Traktor Pro 2. For each preset in the Readme*.pdf file is a description of the proposed effects and how to build it with the help of hand movements. For a more detailed study of the program, use the TornadoA1 Manual, this file is installed on the computer along with the driver and is on the menu Help.
Charging
Charging of batteries of the gloves is provided when the Sensor and Laptop are connected by the USB cable. When the green indicator 10
(Figure 2) on the Sensor is On, this indicates 90% charge level. 100% charge level is reached within 20-30 minutes after the green indicator is On. The operation time of the gloves at 90% charge is around 5-6 hours.
After 15 minute idle time the sensors enter sleep mode; switch off and then switch on power supply for their activation.
During the idle time, the indication LED blinks 1 time in 5 seconds. If the battery is discharged, the indicator blinks slowly within one minute, and then the sensor enters sleep mode. When you prepare sensors for long term storage, always switch off their power supply.
Sensor state monitoring
The option Settings->Sensors->Monitoring (See figure) gives the possibility to check the percentage of the residual charge of built-in batteries and the number of the used frequency band. To get this information, switch on both gloves (or the desirable one) and click the Monitoring button. The gloves must be in close proximity to the USB Adapter. In case of the successful response, sensor indicators will rapidly blink 7 times (confirmation of execution of the command). The Adapter will blink 7 times as well.

Channel occupancy monitoring
Can be tested using the relevant option (see figure) Settings->Sensors Occupancy- >Occupancy Test. If all channels are occupied, the blue indicator (operation indicator) on the USB Adapter in the Running mode will blink or will be off many times. To improve the reliability of radio communications, the USB Adapter must be located at the level of DJ’s mixer or higher, with no metal shields, screens and other obstacles.

Certain technical parameters of Tornado A1
– Low requirement to laptop performance.
– Short delay for MIDI messages, 20 ms max.
– USB interface.
– Radio frequency range: 2.4 GHz.
– Radiation power: 1-10 dBm.
– Integrated antennas.
– Operating range: 5-10 m.
– Low power consumption for sensors. The controller ’s uninterrupted operation time is app. 5-6 hours when using small-size LiPol batteries.
– High interference immunity and operating reliability.
– Embedded protection against generation of false MIDI control signals.
Basic advantages of Tornado A1
– Visual and spectacular.
– Stylish and good-looking.
– Easy to use and practicable.
– Small-sized sensors.
– New flexible methods for controlling the parameters of virtual music studios.
– Perfect integration with musical studios as Traktor 2 Pro and Ableton Live.
– High reliability.
– Multifunction keyboard on the gloves.
– LED light follow-up of musical effects.
– User-friendly and intuitive software interface.
Print Screens of TornadoA1 plug-in for Mac OS X:


Tips for Live Performance with Tornado Gloves:
- Always use the laptop connected to the power supply.
- Disable the laptop hibernation and economy mode.
- Do not put your laptop to sleep before or during a performance.
- Disable the transition of the laptop screen to saving mode.
- Turn off the Internet and automatic update.
- Do not use Wi-Fi and Bluetooth during performance, free laptop resources.
- Deactivate the antivirus program.
- Turn off all the applications which are not used for DJing.
- For a better connection between the gloves and the laptop, install the USB Adapter as high as possible, as close to the gloves and make sure there are no metal barriers between them.
- Ensure that USB cable for Tornado controller is not pulled out during performance.
Notes:
- Driver installment should be done without an attached USB adapter. The adapter should be connected after you restart the laptop.
- After updating your Mac OS X operating system, you need to reinstall the driver and restart your laptop.
- If the gloves are turned on, but the start is not pressed in the Tornado program, then after 15 minutes of waiting, the gloves will go into sleep mode. To get them out of this mode, turn off and then turn on the power again.
- When you turn on the power, the left glove will blink once and the right glove will blink twice. Then they will signal readiness for work by blinking once every 5 seconds. If you press start in the program, the glove switches to operating mode and stops blinking.
- If the red diode flashes continuously, the glove is discharged.
- Do not charge the glove battery for more than an hour. The recommended charging time is 20-30 minutes (when the signal green diode lights up).
- The glove charge is monitored using the Tornado software (Settings-> Sensors-> Monitoring).
- If you use a USB Hub, make sure it can provide the supply voltage of 5V with a current capacity of 100 mA.
- If you need the speed of MIDI port of more than 31,250 baud, turn off the limit (see manual on how to use Tornado program).
- Please, contact our support team, if you have any difficulties.